I Can’t Stop the Itchiness: When your scalp just won’t cooperate

Thanks for stopping by for another post, we welcome you warmly and hope you enjoy today’s read!

Today’s post is dedicated to the naturals who have to do double duty– caring for and maintaining their hair while also treating a skin or scalp condition. While there are many scalp conditions that can make growing and caring for your natural hair a bit more difficult, the focus of this post will be on a condition called Seborrhoeic Dermatitis (or SD).
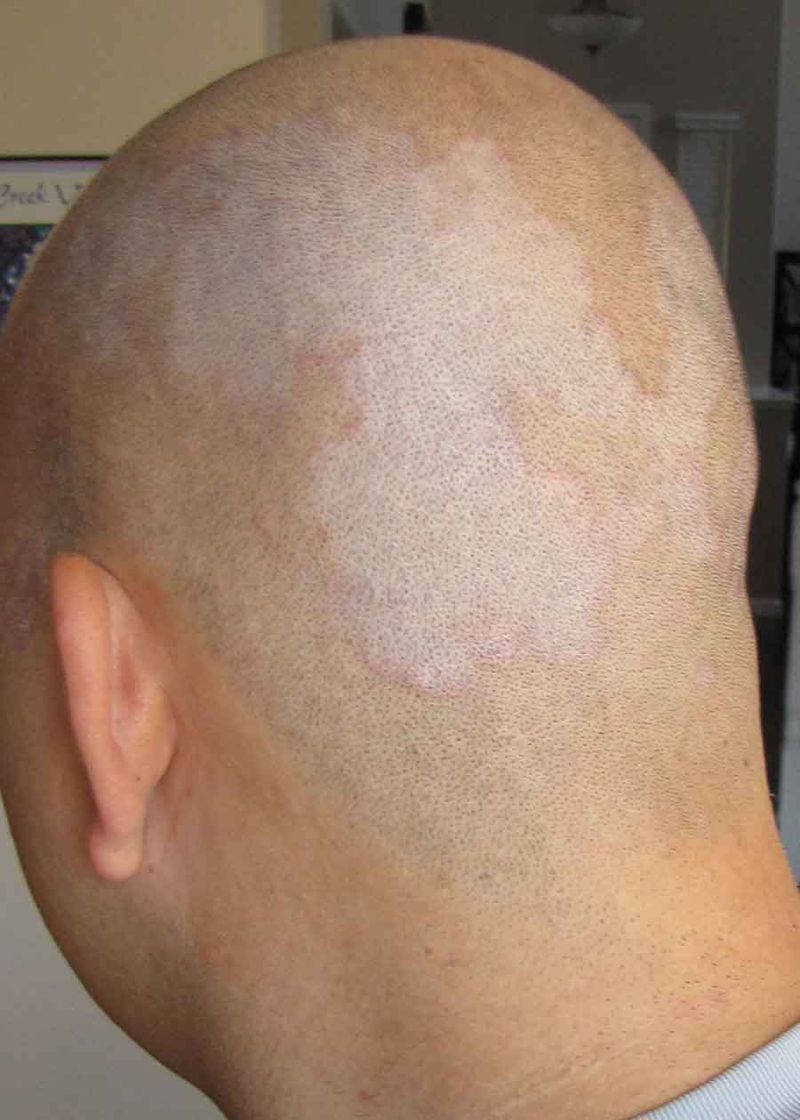
What is Seborrhoeic Dermatitis (SD)?

Seborrhoeic Dermatitis is known to affect the areas of the body where sebum (your skin’s natural oil) is released, such as the folds of the nose, eyebrows, behind the ears, chin, scalp, genital area, etc. SD commonly manifests itself in the form of patches of dry, flaky, scaly skin that can range from super-dry to incredibly oily. The affected area can be very itchy, tender, swollen, bruised, and sensitive to external stimuli. There are many triggers that may cause SD to flare up, including stress, extremely dry or humid weather, excessive sweating, ingestion of certain foods, contact with common allergens (pollen, dust, pet fur, etc).

Treatment:

Currently, there is no permanent solution to SD.  The best thing to do if you suspect or know that you have this condition is to get referred to a good dermatologist to find out the severity of your individual case (severity varies between each individual); from there, s/he can prescribe you with medicated ointments, creams, shampoos to help you get the condition under control and to better manage it.

However, if you’d prefer to get an over-the-counter remedy, there are many options available to you.

Here’s a list of shampoos that can be used to help with your SD:

  1. Head and Shoulders Anti-dandrufff Anti-SD Shampoo: Active ingredient- 1% Selenium sulfide
  2. T-Gel: Active ingredient- 0.5% Coal tar
  3. Nizoral: Active ingredient: 2%  Ketoconazale

In general, all of these shampoos are used to help relieve itchiness, lift and remove flakes, soothe the scalp, and reduce inflammation of the affected area.

Now I’m sure you’re all asking the same question: What’s gonna happen to my hair? The truth is,  yes, all of these shampoos will dry out your hair to a certain degree; moreover, it is recommended that you use these shampoos frequently to keep the condition under control (a naturalistas nightmare!) However, don’t fret, as there is a work-around  that will keep your scalp happy, while also allowing your natural hair to thrive!

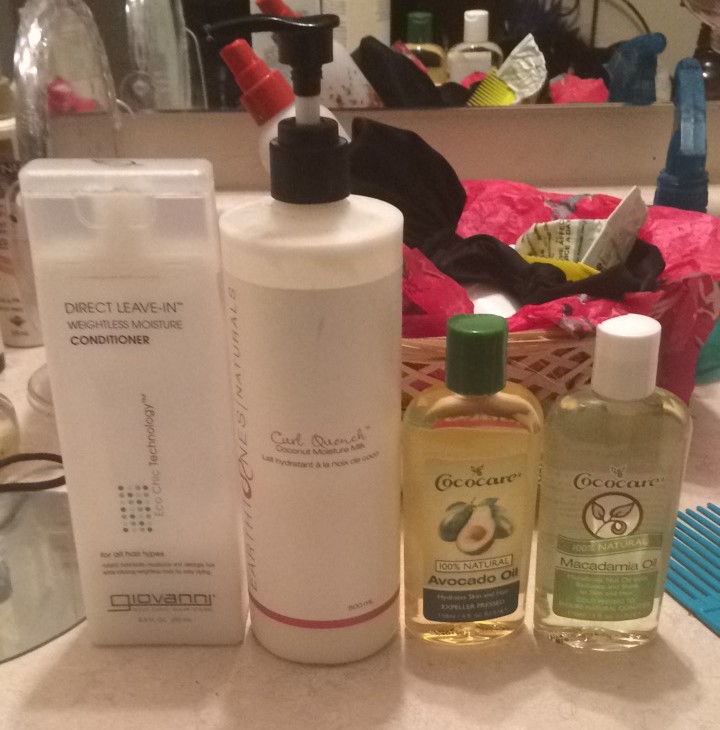
Here’s what you need to do on wash day:

  1. Wet your hair and apply your conditioner before your shampoo– this will help minimize the drying effect of the medicated shampoo on your hair.

2. Take your medicated shampoo, rub it between your hands, and then massage into your scalp- just focus on getting the scalp.

3. Let the shampoo sit for several minutes to ensure that it penetrates your scalp.

4. Wash out the shampoo and conditioner.

5. Follow-up with a deep conditioning masque or treatment.

6. Apply your leave-in conditioner and then seal your hair with whichever oil you prefer.

7. Cover your head with a plastic shower cap or bag for 15 to 30 minutes.

8. Uncover your head and style your hair, as desired.

On a final note, it’s important to be diligent and consistent when treating your scalp. Keep in mind that not every solution works for everyone across the board; so, yes, there will be a little trial-and-error involved in the process of finding the right SD regimen for you.

Finally, don’t despair about the shampoo completely drying out your hair- it’s okay- as long as you focus on the scalp while washing and ensure that you replace the moisture in your hair, as instructed above.

Getting your scalp condition under control is essential to your hair’s overall health and longevity- your hair’s home is your scalp– it can only be as healthy as your scalp is! So here’s to healthier scalps and optimal natural hair growth!

Do you struggle to maintain your hair health due to SD or a similar skin/scalp condition? Let us know your story, techniques, and remedies in the comments!


Baby, It’s Cold Outside! Protecting Your Natural Hair in the Winter


It is undeniable that in many parts of North America, Fall is now in full effect…which means that Winter will be with us soon enough…le sighSo, with that, we must take extra steps to understand the effects that the chilly winter air may have on our kinky, curly hair, and work with our tresses to prevent the potential damage that can take place due to the colder temperatures.

A change in the weather can cause not only changes in our energy levels and skin health but also impacts the way our body grows hair, and how it produces and distributes its natural oils. Even so, it’s a common half-truth that cold temperatures can cause one to lose quite a bit of hair due to excessive shedding. While it is true that colder temperatures can cause the skin- including the skin on the scalp- to become excessively dry, in terms of hair loss vs. hair growth during the colder months, the body is actually at a slight advantage.

The reason why is because, like other mammals, humans tend to grow thicker manes during the winter months; this happens because when it becomes colder, the human body responds by producing and releasing melatonin (a hormone which regulates biorhythms, such as sleeping and waking). Melatonin is said to cause your body to balance out its natural hair growth cycle, which in turn causes the hair to become stronger and potentially grow thicker to counteract the cold.

So, what does all of this mean? Well, it means that you should have no problem retaining your hair length as well as maintaining your hair health despite the winter season, provided you make certain changes to your hair care regimen. (Click here to find out more about the behaviour of hair in winter weather.)

Here are some key changes you should make to your hair regimen to preserve your tresses during the cold weather:

1. First, if you already have a good hydrating, conditioning, and moisturizing hair care routine, please keep it up- you’re already ahead of the game!

2.  Coat your hair, as usual, from roots to ends with your moisturizing/conditioning product(s), paying special attention to the ends.

3.  Make sure you seal-in your moisturizing product(s) by using your preferred oil. ***Keep in mind that low porosity hair prefers lighter oils whereas high porosity hair has an easier time absorbing either thicker or thinner oils- you can also seal high porosity hair by using a natural hair butter (shea butter, cocoa butter, mango butter etc).

4.  Spray a mixture of water, a little oil, and some aloe vera juice on your scalp to help protect, mitigate, and/or reverse the effects of the very drying cold air.

5.  Deep condition once biweekly, at a minimum.

6.  Put your hair away in protective styles: wigs, braids, twists, faux locs, etc- there are a variety to choose from, and they’re all beautiful!

***Do not neglect to properly treat your hair before you put it away; keep it hydrated; and maintain proper scalp care while wearing your protective style, to ensure that your hair will continue to thrive*** 

7.  Consider purchasing a silk or satin lined hat for when you venture out into the cold. Silk and satin cause little to no friction against the hair and are wiser choices in comparison to cotton and knitted hats that can potentially snag and damage your strands.

8.  And finally, as always, please do listen to your hair! Give it what it’s asking for, and it will show you love through its beauty and glory…even though it might be cold outside!


How do you plan on protecting your hair this winter season?


How to Bantu-knot your hair

Bantu knots, also known as Zulu or Nubian knots, chiney bumps, pepper seeds, or hair nubbins, is a traditional African hairstyle, made by sectioning your hair into triangles, diamonds, or squares and coiling those sections into knots.

What you will need:

  • Sulfate-free shampoo and conditioner
  • 
Towel
  • Spray bottle
  • 
Wide-toothed comb/Detangling brush
  • 
Tail comb
  • Butterfly clips/Snag-free ponytail holders
  • Water-based moisturizer
  • Twisting gel/cream
  • Bobby pins (optional)

Steps:

  1. For best results, start with damp hair that has been recently shampooed and conditioned and towel-dried.
  2. Spritz hair with water using a spray bottle.
  3. Use your fingers or a tail comb to divide hair into about 6 to 9 sections, depending on the thickness of the hair.
  4. Separate the sections using butterfly clips or snag-free ponytail holders.
  5. Starting at the back of the head, loosen one section of hair (one on either edge of the nape is usually best).  If the section feels dry, spritz it with some water.
  6. Apply your favourite water-based moisturizer to the section, paying extra attention to the ends of the hair.
  7. Use your fingers/wide-toothed comb/detangling brush to detangle the section of hair.
  8. Apply your favourite twisting cream or gel to the section to the moisturized, detangled section.
  9. Separate with your fingers or part a piece of the section with your tail comb into your desired shape (starting from the edge of the nape makes it easier), keeping in mind that the bigger the piece the bigger the size of your Bantu knot, and clip the rest of the section to the side.
  10. Bend the strand close to its base and pinch the bump created between the thumb and pointer of your left hand, and use your right hand to wind the length of the strand around the bump at the base to form a coil.
  11. Keep winding the length of the strand around the coil with your right hand, gradually winding closer and closer to your head with each round, until all of the strand has been completely wound up, to form a Bantu knot.
  12. If your hair is curly, and your knot is coiled tightly enough, the ends will likely stay coiled under the knot; if your hair is looser, then you may need to use a bobby pin to hold the knot in place.
  13. Unclip the remainder of the section, and repeat Steps 9-12 until the section is completely knotted.
  14. Move on to the next section of hair, and repeat Steps 5-12 until all of the sections are knotted.

***You can also create Bantu knots from two-strand twists: once your two-strand twists are completed, follow steps 10-14 above.***

To keep your Bantu knots neat, wear a satin bonnet or tie your head with a satin/silk headscarf when you go to sleep.

How to cornrow your hair

Cornrows or canerows (or track braids) is a traditional African braiding technique. Cornrows are made by braiding the hair onto the scalp’s surface, after parting the hair into a design.

  1. Part a section of the hair starting from the hairline to the nape, keeping in mind that the thicker the section the thicker your cornrow will be.

2. Clip the rest of the head of hair to the side or put it in a ponytail holder to keep it out of the way while you cornrow the parted section.

3.  Starting at the hairline, take a small piece of the parted section and split that piece into three equal strands.

TIP: Anchor the right strand of hair in-between the middle finger and ring finger of your right hand; and anchor the left strand of hair in-between the middle finger and ring finger of your left hand, and brace your hands against the head, leaving your thumbs and pointer fingers free to pull the outside strands under the middle strand as you braid.

Try to brace your pinky fingers against the head, and hold the strands as upright as possible, to help you get the right tension!

4.  Start braiding the strands like a regular plait using the underhand method (opposite of a French braid) for about two stitches/notches: using the pointer/index finger and thumb of your left hand to pull the right strand under the middle strand; using the pointer/index finger and thumb of your right hand to pull the left strand under the middle strand; the right strand under the middle strand, and the left strand under the middle strand.

5. Now you will start the cornrow.   As you make the motion of pulling the right strand under the middle strand using the pointer/index finger and thumb of your left hand, pick up extra hair from the right side of the parted section and pull it into the right strand. Pull the right strand with added hair under the middle strand.

6.  Then, do the same thing as you make the motion of pulling the left strand under the middle strand using the pointer/index finger and thumb of your right hand,  pick up extra hair from the left side of the parted section into the left strand.  Pull the left strand with added hair under the middle strand.

TIP: As you pull the right and left strands under the middle strand, run your fingers through to the ends to prevent the free ends from tangling.

TIP: As you cornrow, try to keep your hands at an angle of as close to 90 degrees as possible/upright against the head (as opposed to following the direction in which you are cornrowing). Holding your hands at close to 90 degrees/upright will help you get the right tension to keep the cornrow neat and tight (without yanking the hair).

7.  Continue to cornrow, by repeating Steps 5 and 6: picking up extra hair on each side as you pull the right strand under the middle strand, the left strand under the middle strand, the right strand…until there is no more hair to add from the parted section.

TIP: Try to pick up the same amount of hair on each side to make the stitches/notches of your cornrow neat and even.

8.  Once all of the hair in the parted section is cornrowed against the scalp, continue to braid the free ends like a regular plait using the underhand method.

Keeping the cornrow from unwinding:

9.  Once you get to the end of the plait, if the hair is very curly, the cornrow may hold itself together. If not, you can either spiral the ends around your finger, using a little twisting gel/cream, or you can secure the cornrow with a snag-free/covered elastic band, clip, or barrette.

Finishing the style

10. Unclip or loosen the unbraided hair and repeat Steps 1-9 until the entire head is cornrowed.

TIP: How you part the hair will determine the size and shape/design of your cornrows; so, to keep them even, in Step 1, part the new section the same size and in the same shape as the cornrow beside it.  

Also, keep in mind, if you are cornrowing straight back, as you part the hair, you will have to taper the section toward the nape—the hairline and the crown of the head covers more area than the nape, so if you don’t taper the sections, you will run out of hair to cornrow at the back of the head.

Finally, to keep your cornrows neat, wear a satin/silk scarf or headtie, or use a satin/silk pillowcase when you go to sleep. Depending on how curly your hair is, how small the cornrows are, and whether you tie your hair at nighttime, your cornrowed style could last for a few days or up to a week or so.

Happy cornrowing!

Available Now: What Are You Gonna Do with that Hair?

Everyone knows Zuri as “the girl with the puffy hair.” Her afro is big and fluffy, and not even gravity can keep it down. People often ask her, “What are you gonna do with that hair?” Zuri finds the answer in her cultural hair-itage and shows she can sculpt and shape her curls and coils into beautiful works of African art—braids, ‘locks, bantu knots—in other words, whatever she wants!

This illustrated non-fiction book encourages Black girls to celebrate the beauty and versatility of their natural hair and learn the rich history of natural hairstyles.


Get your copy today!

Available in Canada on Amazon.ca: Click here to purchase.

Also available in-store at Knowledge Bookstore: 177 Queen Street West, Brampton, Ontario L6Y 1M5.

Available in the United States on Amazon.com: Click here to purchase.

Every day is a good hair day!


What Are You Gonna Do with that Hair? Book Launch

book-launch-collage

Let’s celebrate Black History Month together at the book launch for “What Are You Gonna Do with that Hair?” at Knowledge Bookstore (117 Queen St W, Brampton, Ontario L6Y 1M3) on Saturday, February 25, 2017, at 2pm!

This is a FREE event! Please register on Eventbrite: zurisbeautifulhair.eventbrite.com

For more information, please visit www.knowledgebookstore.com or www.thenaturalhairadvocate.com

Follow us on:
Facebook: The Natural Hair Advocate
Twitter: @TheNHAdvocate
Instagram: @zurisbeautifulhair
#ZurisBeautifulHair

Sleeping Beauty

If you’ve ever gone on an overnight trip with a Black girl (or if you’re in a relationship with one), then you know that she’s not hitting the sack until she’s tied her hair up with her beloved hair tie.  As I mentioned in a previous postthe head tie is a Black girl’s most prized possession– for a number of different reasons- one of which is to keep her hairstyle intact while she’s sleeping.  But in case you didn’t know already, wearing a head tie also protects Black hair from breakage caused by tossing and turning on cotton pillowcases.

red_and_blue_bandannasI grew up tying my hair down with a cotton bandanna and/or a nylon stocking cap, which I now know are big natural hair no-nos! Cotton absorbs the moisture and oils from natural hair, leaving it dry, and subject to breakage; while nylon stocking caps can snag your hair if they are too tight, and can also damage your edges. In any case, by the time I got to undergrad, I had graduated to sleeping with a (much more sophisticated) satin-y bonnet (I say “satin-y” because it was actually one of those polyester ones from the Black beauty store). And ever since then, it’s been all about the bonnet (thanks, Spelman sisters!); I only really opt for the head tie when I’m trying to keep my frizzies down for a sleeker look.

Note: I know many ladies complain about their bonnets falling off at night; so, try to find one that is snug enough to stay on, but not so tight as to damage your hair.

20160914_160131 However, before I got married, I often wondered what my husband was going to think about my beloved bonnet.  After all, a bonnet that makes you look like Mother Goose is not exactly the sexiest thing in the world…but, then again, neither is having damaged hair!  Thankfully, my husband never let the bonnet bother him, lol; but for those times when I’m feeling extra romantic, I have discovered a better alternative: a satin or silk pillowcase (that way, I can protect my tresses and preserve my sexy at the same time!)

For the longest time, I had been using (again) a cheap polyester one from the Black hair store…


20160206_110000

Those lint balls alone show how gentle this cheap stuff can be on your hair…

20160206_105935


…but I decided to invest in a real silk one (from London Ivy Products), and I don’t think I could ever go back- it feels so good!

20160206_105037 20160206_105308 20160206_105540

Also, apparently, sleeping on silk is not only good for your hair, it’s good for your skin, tooso, double-win!   

I believe every queen should protect her crown! Black hair is fragile and therefore requires tender loving care; so, remember to be gentle with your hair, even when you’re in bed, Sleeping Beauty! Avoid cotton and nylon, and treat yourself to some silk or satin- trust me, your hair (and skin) will thank you!

If you’re looking for real satin bonnets, check out: Earthtones Naturals – Satin Bonnets

Or if you prefer silk pillowcases, check out: London Ivy Products – Silk Pillowcases

How do you preserve your beauty while you sleep?


Ode to the wide-toothed comb

the gate - Jamaica

The gate that sealed my fate…

When I was a little girl, I absolutely dreaded combing my hair, especially after having it washed. I have a distinct memory from my first trip to Jamaica when my Mom announced one day that she was going to wash my hair.  A high-speed chase ensued, as I took advantage of the fact that my Grandfather’s house- unlike our apartment in Toronto- had a back door which led around the house to the front courtyard, giving me a chance to make a break for it…Much to my dismay, however, the front gate was locked, which prevented me from running right off the property (to safety).

“Pleeeease just cut it off, pleeeeease, Mommy, cut it off,” I screamed, as my Mom, Dad, and company, chased me around and around the house, til they finally cornered me…and, alas, my fate was sealed…Sadly, my Mom did not cut my hair off that day- she proceeded to wash it- and let’s just say I ended up paying a pretty penny for making her have to exert extra energy to get the job done…

wash day smiles - Jamaica

Me, after the ordeal, with my signature post-wash chiney bumps (aka bantu knots)…my Uncle Geo (middle) and his friend somehow managed to make everything better

Needless to say, I hated washing my hair.  And washing my hair never went down without a fight, which also meant I’d have sudsy water running into my eyes and sometimes even into my nose, which only made the situation worse.

I hated washing my hair because I knew that after the washing and conditioning, came the detangling part, which meant having to endure my Arch-Enemy…the Comb.

fine-tooth comb

My Arch-Enemy for many years

Due to the spiral shape of Black hair, it is prone to getting tangled: the curls end up linking up with each other, forming knots and snarls, which can make combing difficult.  Back when I was a girl, the standard comb was not made with textured-haired girls in mind: the teeth were fine, and therefore couldn’t get past the tangles.  On top of that, in their efforts to “detangle” the hair quickly, our mothers and other caregivers would just yank the comb from the roots, which made for a less than pleasant experience, to say the least, filled with lots of screaming and tears.

So, when the wide-toothed comb finally came on to the scene (around the time when I was eight or nine years old), I counted it as a blessing from on high; and ever since then, my life has never been the same. My wide-toothed comb has changed my life so much that I wrote it a love poem:


Ode to the wide-toothed comb

O wide-toothed comb

When you came into my life,

you removed the pain and strife

of combing through my curls.


tail combO wide-toothed comb,

Once I was tender-headed, and

Doing my hair was dreaded

Since the tines were way too fine


O wide-toothed comb

Using you, I’ve not regretted

And forever I’m indebted

To your wonderful design


O wide-toothed comb

Now detangling I’ll survive

And my hair will grow and thrive

‘Cause you’re made for natural girls

~ Ndija Anderson-Yantha

wide tooth comb


Pretty corny, I admit, lol! But having suffered through my own terrible experiences with having my hair combed, I know that the detangling process can be one of the most frustrating parts of having natural hair.  However, I also want you to know that your child’s natural hair IS actually manageable- you just have to be armed with the right tools, products, and techniques.  And trust me, having the right type of comb or brush can make all the difference!

Here are some tips for detangling natural hair:

  • Separate the hair into 6-12 sections (depending on the thickness) using your fingers, and hold the sections with butterfly clips or ponytail holders
  • Take a section of hair, and use a spray bottle to spritz with water
  • Apply a water-based moisturizer to the section
  • Use your fingers to gently work through the ends
  • Use a wide-toothed comb or a detangling brush to work through the section, while gripping the section with your other hand to absorb the pull of the comb/brush through the hair
  • Comb through the ends first, and then work your way up to the roots

AVOID

  • Raking through natural hair with a fine-toothed comb- this will not only damage your daughter’s hair by ripping through the curls and causing breakage, but it can also make for a very traumatic experience, resulting in tears and creating negative feelings about her hair
  • Combing through natural hair when it’s completely dry, if at all possible- moist hair makes the detangling process easier, as it allows the comb to glide over the curls easier

Believe it or not, combing natural hair DOES NOT have to be a nightmarish process: with the help of a wide-toothed comb and/or a good detangling brush, combing and styling your daughter’s hair can instead become a time for growing closer, passing on traditions, and creating positive memories that will last a lifetime.

What types of tools and techniques do you use for detangling natural hair?


Making Waves: Black Girls Can Swim Too!

Kazan_2015_-_Simone_Manuel copy

Olympic Gold Medalist Simone Manuel (By Chan-Fan – Own work, CC BY-SA 4.0, https://commons.wikimedia.org/w/index.php?curid=42503090)

As I’m sure we all can agree, this year’s Olympics in Rio will be a session of the Games that we won’t soon forget! In case you missed it, Simone Manuel made history by becoming the first African-American woman to win a gold medal in an individual event. In doing so, she shattered an age-old belief that Black people- and Black women in particular- don’t swim.  This belief had some validity to it because, for a long time, the notion of #SwimmingwhileBlack was constrained by a number of factors, such as segregated pools, socio-economic status, fear, and of course, hair.

Thanks to the phenomenon of “turning back” or reversion, water was once known as the arch-enemy of kinky-, coily-haired folks (and it still is for some).  A splash of H2O could turn the sleekest press-out back into an afro, and at the very least, crinkle even the finest perm, so many Black girls and women would avoid the pool like the plague.

Although wearing your hair naturally does away with those problems, the chlorine in pool water still presents a threat: chlorinated water can wreak havoc on textured heads because it strips precious oils from our already-prone-to-being-dry hair. As a result, Black hair and the swimming pool have not always been on the best of terms.

After my 1st swimming lesson

My Dad and me in Jamaica after my 1st swimming “lesson”

Though I grew up around Black people who swam (e.g. my parents, aunts, uncles),  it took me a long time to learn how to swim because I was terrified of water.  During my first trip to Jamaica when I was four, my Dad tried to teach me how to swim the same way he learned: by throwing me into the sea.  Sadly, I was not as fast of a learner as he was; I started sinking, and then I panicked, which only led to me inhaling and swallowing a lot of salty sea water.  Needless to say, I left the beach that day traumatized…with a newfound fear…and no desire to learn how to swim.

Luckily for me, I was forced to learn because my middle school had a pool. Eventually, I grew to love swimming, but I hated having to deal with my hair afterward, even though I was a natural teen.   For me, I wasn’t concerned about my hair turning back, but I still had to contend with getting the chlorine out, which meant frequent washing- with shampoos that weren’t made for my hair (i.e. UltraSwimTM)- and constant detangling.  As a result, my hair suffered and I experienced a lot of breakage back in those days.

Fun at the lake

My sister, cousins and me having fun at a lake in Northern Ontario- all armed with our swim caps

Now, as an adult, I really enjoy swimming, and my husband and I often go for a dip at the gym as a full body workout.  I would be lying to you, though, if I said that my hair is no longer a consideration at all.  Sadly, it still is.  If I know I won’t have enough time to invest in proper post-swim maintenance, I just won’t go; but this is something that I’m really working to overcome because I don’t like the idea of feeling trapped because of my hair. (However, I also don’t like the idea of it all breaking off either!)

Black girls can swim too!

Although Black hair may require some extra attention before diving in, it doesn’t mean you have to give up your dreams of becoming an Olympic swimming champion (or simply your aspirations of becoming a regular at your local pool) just yet.  As Simone Manuel has shown the world, It is possible for Black girls to swim- and with a full head of hair too!

Here are some tips for protecting your hair while swimming:

Before your swim:

  • Saturate your hair with coconut oil or leave-in conditioner before diving in– it will serve as protective barrier between your hair and the water
  • If you don’t have coconut oil or conditioner available, at the very least, drench your hair in the shower to minimize the amount of chlorinated water your hair will absorb once you’re in the pool
  • Plait your hair into 2 or more braids to prevent it from getting tangled
  • If you’re not concerned about making a fashion statement, wear a swim cap

After your swim:

  • Wash your hair with a sulfate-free chelating (formulated to remove mineral deposits) shampoo to help cleanse the chlorine from your hair
  • Deep-condition your hair to restore it to its normal moisture levels
  • Moisturize, detangle, and style your hair as normal

For the past couple of years, I have been using these methods whenever I go swimming, and so far, my hair has been faring pretty well.  So, if you have the desire to become the next Simone Manuel, please don’t let your hair get in the way.  Pull it back, slap on a cap, get in the water, and start making some waves– it’s no secret that there are enough obstacles out there, trying to keep us from achieving our dreams- so let’s not make our hair one of them!

Sources: The Science of Black Hair: A Comprehensive Guide to Textured Hair Care by Audrey Davis-Sivasothy, Saja Publishing, 2011

How do you take care of your hair when you go swimming?

Coming soon…

Meet Zuri
Zuri loves her natural hair and all of the amazing things she can do with it!

Zuri -Coming Soon

Follow her throughout history and around the world as she learns about the beauty and versatility of natural hairstyles in What Are You Gonna Do with that Hair? 

Coming soon…